Showing posts with label Git. Show all posts

Thursday, March 5, 2015

Windows -> Unix convert line endings with Git

Recently we met a problem, that files we fetch from TFVC to Linux build agents fail the build.

Problem was good old line endings - all our files had CRLF, since they were checked in from Windows.
Problem never appeared before, previously people were using Perforce clients, which can fix line ending for the "host" operating system. With Team Explorer everywhere that was not a case anymore.
So long story short, I ended up with need to fix line ending for the set of files, located in the same directory. Massive convertion of file endings... I need a tool... Git! So I created a script which convert line endings for all files in a specific directory (and subdirectories) and checks in to TFVC.

Configure Git line endings to unix style :
git config --global core.autocrlf input

Go into folder which need to be converted:
cd MYFOLDER

Make Folder a git repo, checkin all files:
git init
git add *
git commit -m "make it a unix, baby..."

At this moment in repository files are with Unix line endings, but locally on disk - still unchanged. Let's fix that.

Delete all files and then undo change so it will fetch back from repository:
git rm *
git reset
git checkout *

Now all files have correct line endings, we need to checkin to TFVC. So, delete .git in  your folder:
rd .git /S /Q

Go up one level and checkout your folder and all under:
cd ..
tf checkout MYFOLDER /recursive

Checkin to TFS forcibely (it does not see the difference if only line endings changed, so we need to force):
tf checkin MYFOLDER /recursive /force /noprompt


Voila :)

What is extra nice,  Visual Studio is clever enougth to deal with Linux style line endings. So I still can build my solution with devenv.exe. 
And even msbuild had nothing against unix style line endings.

PS: some more reading on subject

PPS: Of course, if you want to checkin changes or new files to TFVC, you need to watch line endings. It is possibel to configure your TFVC client to be aware. See more information here:
or here:


Wednesday, February 18, 2015

TeamCity + TFS Git repository: unable to find valid certification path to requested target

Accessing TFS Git repository from TeamCity, for an on-premises TFS installation gives you the following error?

Failed for the root '"XXX Git" {instance id=225, parent internal id=48, parent id=XXX_YYY_Git, description: "https://tfsinstance/tfs/DefaultCollection/TeamProject/_git/GitRepository#refs/heads/master"}: List remote refs failed: javax.net.ssl.SSLHandshakeException: sun.security.validator.ValidatorException: PKIX path building failed: sun.security.provider.certpath.SunCertPathBuilderException: unable to find valid certification path to requested target 

Your corporate certificate is not known by TeamCity. This is how you fix the problem.

Save your corporate root certificate into CompanyRoot.cer file

For server side checkout: 
  1. Login to the TeamCity server machine
  2. Add this root certificate to keystore of your TeamCity 
%TeamCityInstallDir%\jre\bin\keytool.exe  -importcert -trustcacerts -file CompanyRoot.cer -alias ca_alias -keystore "%TeamCityInstallDir%\jre\lib\security\cacerts"

(replace %TeamCityInstallDir% with actual path to your TeamCity)

If you haven't ever changed it, password for the keystore is changeit :)

For agent side checkout:
  1. Install Git on agent machine to lets say C:\Programs\Git\
  2. Run on agent machine git config --global http.sslCAInfo D:\Programs\Git\bin\curl-ca-bundle.crt
  3. Edit curl-ca-bundle.crt manually, add your Company root certificate to the end of the file
Mor information can be found here: 


Wednesday, May 14, 2014

Git problem connecting to TFS on-premise from Bamboo agent

That was a weird case - thus even more interesting to solve.

We needed to connect our on-premise TFS instance with Git projects to build on Bamboo build environment (there will come a full howto-step-by-step post about it later).
And besides everything  was set up correct, build was still failing trying to fetch code from repository. Error looked like:

fatal: https://{buildUser}@tfs.osiris.no/tfs/{Collection}/{TeamProject}/_git/{RepositoryName}/info/refs?service=git-upload-pack not found: did you run git update-server-info on the server?

More interesting - testing the same stuff against my own VisualStudio repository in Azure went smooth.

Narrowing the scope showed up that the command failing was git-ls-remote:

git ls-remote https://{buildUser}:*****@tfs.osiris.no/tfs/{Collection}/{TeamProject}/_git/{RepositoryName}

The problem was (weird!) that the password for the build user contained ! at the end. After I changed the password - everything went fine. Even more - after I changed the password back it still goes fine...

For info: it is git version 1.8.1.4 running at Amazon elastic cloud build instanse.

Wednesday, January 22, 2014

Managing TFS Git branches in Visual Studio

About Branches
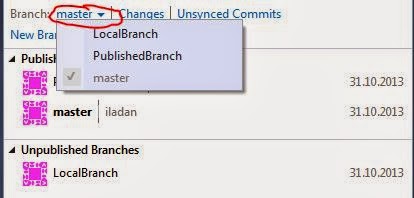
First of all, there are 2 general types of branches you can have - Unpublished(local) and Published.

 Published is accessible to all your team members and is also visible in Team Web Access (TWA).


So as you can see - my LocalBranch is not visible in list of branches from TWA. 

To be able to work with Published branch you need a local copy of it - local branch. So you have - totally local branches - yours only, and local branches which are local working copy of Published branches.

All local branches are accessible to check-out in Branches list:

Creating a Branch

To create a branch in Visual Studio go to Branches menu:

Select New Branch and provide name of the new branch and which branch it should be taken from.
Afrer pressing "Create Branch" the new branch will be created and should appear in Unpublished Branches list (if the original was Local) or in Published Branches (if the original was on server - has name like origin\something).

You can publish any unpublished branch by right-click -> "Publish Branch" or keep it local if you want to.

A bit more...

You can see yourself which branches are connected to which published version -
From Branches explorer in Visual Studio select Actions and "Open in File Explorer":

From there navigate to a hidden folder named .git and open for edit file config. This file has list of branches created and also information if the branch is published. That is how mine looks like:
[branch "PublishedBranch"]
    remote = origin
    merge = refs/heads/PublishedBranch
[branch "master"]
    remote = origin
    merge = refs/heads/master
[branch "LocalBranch"]
[branch "NewBranch"]
    remote = origin
    merge = refs/heads/master


Monday, December 2, 2013

Visual Studio and Git - handling deleted repository

I created a Git repository in TFS and then renamed it.
The problem was Visual Studio still insisted to clone with the old name! And in attempt to connect I recevied :
An error was raised by libgit2. Category = Net (Error).

Of course, the repository didn't exist any more. So I tried to refresh, restart and etc, to let Visual Studio figure out that repository has a new name. Nope, no way.

So I found where those properties are locally saved -
C:\Users\my.user\AppData\Roaming\Microsoft\VisualStudio\12.0\Team Explorer\GitTeamProjects.config

Inside it looks like:
...
<project name="Inmeta" projectUri="...">
      <repository name="OldRepositoryName" guid="896f85d7-b840-48ed-92d5-74b223b34f66" />
</project>

...

I just deleted the whole line staring with <repository... and restarted Visual Studio.
And voila - the new repository name was discovered and shown correctly to clone :)

Wednesday, November 20, 2013

TFS to Git migration: step by step

It has been some posts about migrating to Git from TFS, unfortunately none of them worked for mas expected.

So, my task was: migrate a source from TFS to Git, preserve all history, but do not include dlls or other heavy files. Last part requires naturally not only removing those files from the latest source, but also removing it from the entire history.
On my way I met some hickups, which I will mention, so the road for others after me can be smooth :)

So, lets start!
You will use GitBash and Git-tf:

1. Install Git-TF. Follow this link and download latest release:  http://gittf.codeplex.com/
 Installation instruction is very easy, I chosen not to use Chocolatey, but changed PATH environment variables, worked perfectly.

2. Start GitBash. If you do not have it - can be downloaded from here

Note! All things from now are done from under GitBash.

Check if git-tf was installed successfully - just type "git tf", it should return usage description of git tf command.

Navigate to the place where you have you Git repositories. I use C:\Git\Sources\Repos folder. So my git promt looks like this now:

3. Clone my TFS source to some temporary Git repo.
git tf clone {collection url} {team project path} {temp repo name} --deep

like this:

Note --deep - that means I want to take history as well.

4. Create Git repository which you will use later as your Git source. So far I will not link it to TFS Git repository, just create it.
git init {repo name}
like this:

get into newly create repository by simply
cd {repo name}
you can see you are in a master branch of your newly created repository:

5. Being there, now pull the source from you temp TFS git to your future Git place:
git pull ../{temp repo name} --depth=100000000

teoretically we could push it to our TFS git already now, but first lets cleanup dlls or other unneeded files, so when we put it to TFS git it is all clean and lightweight.

In my example I had 2 installation files located in folder wix/wixDownloads. So I want to leave those behind.

git filter-branch --force --index-filter 'git rm -rf --cached --ignore-unmatch wix/wixdownloads'
Command works only from the root, so paths must be relative from there.
If I would need to delete only one file, I would type:
git filter-branch --force --index-filter 'git rm --cached --ignore-unmatch wix/wixdounloads/wix35.msi' 
It is important it says was rewritten in the end, that means stuff was actually removed. Otherwise - you probably misspell something.

If you type wrong, sometimes you get error "cannot remove directory '..../.git-rewrite" : directory is not empty. Dont panic, just remove it manually.

6. We are almost there! Now just clean up so all deleted files are physically deleted:
git reflog expire --all
git  gc --aggressive --prune
Now you can compare size og original forlder with clone from TFS, and size of cleaned up folder.
If everything is correct, the second one is much smaller!

7. And finally - push up to your TFS git:

git remote add master {your  TFS Git repository address}
git push -u master --all
like this: 

8. Now, when I compare hisoty on my original TFS source to history on my new TFS git source, I see no wixDownloads folder, and even not a corresponding checkin (well, this is because checkin contained JUST this folder, and no other files).


To the left - my new Git repo history, to the right - my original TFS history.

Hope it saves somebodys time!

Update 1: there is a possibility to hit  error when pulling source to the temp repository, if full filenames on temp repository exceed 256 symbols:

 error: unable to create file ...{verylongfullpath}... (Filename too long)

ignoring the error gets us on with being unable to do filter-branch and error:
fatal: Neeeded a single revision

To get around that make sure that the folder name for temp repo is short enough. In my case I just deleted temp repository, created a new one with a very short name and did git pull again.