Bohrbug is a "good, solid bug".
Mandelbug is a bug whose causes are so complex it defies repair, or makes its behavior appear chaotic or even non-deterministic.
Schrödinbug is a bug that manifests itself in running software after a programmer notices that the code should never have worked in the first place.
Heisenbug is a software bug that seems to disappear or alter its behavior when one attempts to study it.
Hindenbug is a bug with catastrophic behavior.
PS: originated from http://en.wikipedia.org/wiki/Heisenbug
Tuesday, November 4, 2014
Thursday, October 23, 2014
Howto: version your nuget pack
There are several ways to set a version on your nuget pack:
At a very simple scenario we do nuget pack MyProject.csproj and it all works - nuget pack gets the same version as an assembly produced by building the project. There is no need in .nuspec file whatsoever.
In a real life nuget pack consists of more then one dll, sometimes some context files, sometimes some dependencies. So - we need a .nuspec file. And we make one by running nuget spec MyProject.csproj
The default generated .nuspec file already contains $version$ parameter. Now we can modify that nuspec file as we want, add description, extra dlls. Here we can hardcode version number and just call nuget pack MyProject.nuspec or send version in as a parameter like this: nuget pack MyProject.nuspec -Version 1.0.0.0
Mmmkey, but I want it to pick version from the project...
In that case we just call nuget pack MyProject.csproj again! Having MyProject.nuspec file next to project file nuget will be able to locate it and use it. The $version$ parameter gets populated based on the assembly information of the MyProject. And the rest gets picked up from .nuspec.
Now let's say we need an X.X.X-beta nuget pack - and assembly version does not allow any "beta" syntax. So - we use AssemblyInformationalVersion attribute in your AssemblyInfo.cs file.
[assembly: AssemblyVersion("1.0.0.0")]
[assembly: AssemblyInformationalVersion("1.0.0.0-beta")]
[assembly: AssemblyFileVersion("1.0.0.0")]
The assembly version will still be 1.0.0.0, but the nuget pack gets version 1.0.0.0-beta. Perfect!
Here is a very good link explaining what is the actual difference between those attributes.
PS: some auto-magic happens when we do nuget pack for project file, - like auto-generating dependencies, auto-add content files, etc. I will tell about it in my next post.
Happy nuget-ing!
- using project file information
- hardcoded version number in your .nuspec file
- sending -version parameter to "nuget pack" command
- mixture of above
At a very simple scenario we do nuget pack MyProject.csproj and it all works - nuget pack gets the same version as an assembly produced by building the project. There is no need in .nuspec file whatsoever.
In a real life nuget pack consists of more then one dll, sometimes some context files, sometimes some dependencies. So - we need a .nuspec file. And we make one by running nuget spec MyProject.csproj
The default generated .nuspec file already contains $version$ parameter. Now we can modify that nuspec file as we want, add description, extra dlls. Here we can hardcode version number and just call nuget pack MyProject.nuspec or send version in as a parameter like this: nuget pack MyProject.nuspec -Version 1.0.0.0
Mmmkey, but I want it to pick version from the project...
In that case we just call nuget pack MyProject.csproj again! Having MyProject.nuspec file next to project file nuget will be able to locate it and use it. The $version$ parameter gets populated based on the assembly information of the MyProject. And the rest gets picked up from .nuspec.
Now let's say we need an X.X.X-beta nuget pack - and assembly version does not allow any "beta" syntax. So - we use AssemblyInformationalVersion attribute in your AssemblyInfo.cs file.
[assembly: AssemblyVersion("1.0.0.0")]
[assembly: AssemblyInformationalVersion("1.0.0.0-beta")]
[assembly: AssemblyFileVersion("1.0.0.0")]
The assembly version will still be 1.0.0.0, but the nuget pack gets version 1.0.0.0-beta. Perfect!
Here is a very good link explaining what is the actual difference between those attributes.
PS: some auto-magic happens when we do nuget pack for project file, - like auto-generating dependencies, auto-add content files, etc. I will tell about it in my next post.
Happy nuget-ing!
Wednesday, October 22, 2014
Which nuget.config am I using?
Those are my nuget usage scenarios:
At some point it was vital to know - which nuget.config am I actually using?
The default location for nuget.config is C:\Users\{UserName}\AppData\Roaming\NuGet\NuGet.config
Nuget chains configuration files, if there are several. It loads default nuget.config, then searches down from drive's root to {CurrentFolder}, then adds config file specified with -ConfigFile switch. {CurrentFolder} is either the solution root directory or an invocation directory. Later located config files are "stronger" and can override settings from previously loaded.
Calling nuget from command line - loads default config and then loads all nuget.config files searching from the drive's root and down to invocation directory. Remember - than later found than stronger. So than closer to invocation directory than better.
For using nuget.exe in a post-build event my solution is to specify location of nuget.config in a post-build event explicitely, using -ConfigFile switch. I can not know for sure from where my project will be built.
- from command line
- from Visual Studio package manager
- as a post-build event in Visual Studio
- with automatic package restore in Visual Studio
- on TeamCity build server (this I consider to be a command line as well)
At some point it was vital to know - which nuget.config am I actually using?
The default location for nuget.config is C:\Users\{UserName}\AppData\Roaming\NuGet\NuGet.config
Nuget chains configuration files, if there are several. It loads default nuget.config, then searches down from drive's root to {CurrentFolder}, then adds config file specified with -ConfigFile switch. {CurrentFolder} is either the solution root directory or an invocation directory. Later located config files are "stronger" and can override settings from previously loaded.
Calling nuget from command line - loads default config and then loads all nuget.config files searching from the drive's root and down to invocation directory. Remember - than later found than stronger. So than closer to invocation directory than better.
When working in Visual Studio package manager - placing nuget.config in the solution root directory is good enough to know that's the one being used. Basically, working in package manager is same as working from command line, having solution root directory as an invocation directory.
For using nuget.exe in a post-build event my solution is to specify location of nuget.config in a post-build event explicitely, using -ConfigFile switch. I can not know for sure from where my project will be built.
Example: nuget push $(ProjectDir)$(OutputPath)*.nupkg -ConfigFile $(SolutionDir).nuget\nuget.config
A bit different though when Visual Studio does automatic package restore. We definitely want to avoid adding packages to Source Control, and there is a nice config setting for that:
<add key="disableSourceControlIntegration" value="true" />
But - that one will work only if you have your nuget.config file in .nuget subfolder at the Solution Root directory.
Happy nuget-ing :)
PS: For testing I used VS 2013 Update3 and nuget 2.8
PPS: a detailed, yet not very transparent documentation can be found here.
Wednesday, October 8, 2014
Howto: Set up TeamCity to use TFS Proxy
TeamCity usage of TFS as a source provider is not exactly perfect, but setting up fetching data using TFS Proxy worked surprisingly well!
So, we have some TFS server and a configured TFS proxy with address, let's say http://tfsProxy:8081
and now we need to explain TeamCity that it should fetch files using it.
Configure VCS root pointing to TFS server as ususal, do not think about proxy yet.
And now - all you need to do is to set up an environment variable TFSProxy with the value of TFS Proxy address.
Then restart TeamCity agent - if you use agent side checkout. Or restart TeamCity server - if you use server side checkout.
NB! Sending TFSProxy as an environment variable to build will not work. It MUST be an environment variable on a machine which is fetching code.
Testing scenario:
Set up a build to fetch some data from TFS.
1. Clean up TFS Proxy cache by deleting all under: %TFS_Proxy_install_directory%\Version Control Proxy\_tfs_data\Proxy
2. Clean up TeamCity cache:
- Server side checkout - delete all under %TeamCity Data Directory%\system\caches\sources
- Agent side checkout - delete all under %localappdata%\Microsoft\Team Foundation\5.0\Cache
3. Clean up build directory from source files, if not empty.
4. Start build and see Cache folder getting populated on TFS Proxy machine :)
Hope that helps!
Wednesday, May 14, 2014
Git problem connecting to TFS on-premise from Bamboo agent
That was a weird case - thus even more interesting to solve.
We needed to connect our on-premise TFS instance with Git projects to build on Bamboo build environment (there will come a full howto-step-by-step post about it later).
And besides everything was set up correct, build was still failing trying to fetch code from repository. Error looked like:
fatal: https://{buildUser}@tfs.osiris.no/tfs/{Collection}/{TeamProject}/_git/{RepositoryName}/info/refs?service=git-upload-pack not found: did you run git update-server-info on the server?
More interesting - testing the same stuff against my own VisualStudio repository in Azure went smooth.
Narrowing the scope showed up that the command failing was git-ls-remote:
git ls-remote https://{buildUser}:*****@tfs.osiris.no/tfs/{Collection}/{TeamProject}/_git/{RepositoryName}
The problem was (weird!) that the password for the build user contained ! at the end. After I changed the password - everything went fine. Even more - after I changed the password back it still goes fine...
For info: it is git version 1.8.1.4 running at Amazon elastic cloud build instanse.
Wednesday, April 16, 2014
3 things to know to set up DC in Azure
I assume some have already configured domain controller on-premise. It is almost the same, when you do it in Azure, accept for few things. But those are important things.
1. Set a static IP for your domain controller
Actually your IP address stay persistent for 45 years if you do not stop your VM. But if you do stop\deallocate your VM - you might get another IP address after start. And that is (softly said) not so good for domain controller and DNS server.
So make sure to confiure a "static" IP for your DC, like this, using powershell:
(If my vm name is myTestDC and corresponding cloud service name is myTestDC)
$dcvm = Get-AzureVM -ServiceName myTestDC -Name myTestDC
Set-AzureStaticVNetIP -VM $dcvm -IPAddress 192.168.0.4 | Update-AzureVM
2. Configure location of NTDS and SYSVOL to be on Data disk, not OS disk
Azure provides us with 2 types of disks - OS and Data. Where as OS disks are using caching by default, and Data - not. So make sure to attach an extra Data disk to your DC and configure your ntds and sysvoll to be placed there.
3. Modify you network DNS to include new DNS server
 Existing vm-s will need restart to pickup new DNS settings.
x. And another, rather tiny but important thing :) Administrator username is not allowed to use in Azure, so - say my administrator name is superAdmin, password superPassword, and I created domain superDomain.Test with netbios name superTest. Logging into my DC after restart is superTest\superAdmin with password superPassword.
PS: Howether, if you demote your DC - suddenly you will need to login with .\administrator and password superPassword. ...Assume it is a bug, not a feture.
1. Set a static IP for your domain controller
Actually your IP address stay persistent for 45 years if you do not stop your VM. But if you do stop\deallocate your VM - you might get another IP address after start. And that is (softly said) not so good for domain controller and DNS server.
So make sure to confiure a "static" IP for your DC, like this, using powershell:
(If my vm name is myTestDC and corresponding cloud service name is myTestDC)
$dcvm = Get-AzureVM -ServiceName myTestDC -Name myTestDC
Set-AzureStaticVNetIP -VM $dcvm -IPAddress 192.168.0.4 | Update-AzureVM
2. Configure location of NTDS and SYSVOL to be on Data disk, not OS disk
Azure provides us with 2 types of disks - OS and Data. Where as OS disks are using caching by default, and Data - not. So make sure to attach an extra Data disk to your DC and configure your ntds and sysvoll to be placed there.
3. Modify you network DNS to include new DNS server
x. And another, rather tiny but important thing :) Administrator username is not allowed to use in Azure, so - say my administrator name is superAdmin, password superPassword, and I created domain superDomain.Test with netbios name superTest. Logging into my DC after restart is superTest\superAdmin with password superPassword.
PS: Howether, if you demote your DC - suddenly you will need to login with .\administrator and password superPassword. ...Assume it is a bug, not a feture.
Wednesday, January 22, 2014
Managing TFS Git branches in Visual Studio
About Branches
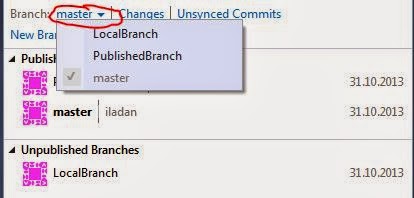
First of all, there are 2 general types of branches you can have - Unpublished(local) and Published.

Published is accessible to all your team members and is also visible in Team Web Access (TWA).


Select New Branch and provide name of the new branch and which branch it should be taken from.
 Afrer pressing "Create Branch" the new branch will be created and should appear in Unpublished Branches list (if the original was Local) or in Published Branches (if the original was on server - has name like origin\something).
You can publish any unpublished branch by right-click -> "Publish Branch" or keep it local if you want to.
A bit more...
You can see yourself which branches are connected to which published version -
From Branches explorer in Visual Studio select Actions and "Open in File Explorer":

From there navigate to a hidden folder named .git and open for edit file config. This file has list of branches created and also information if the branch is published. That is how mine looks like:
[branch "PublishedBranch"]
remote = origin
merge = refs/heads/PublishedBranch
[branch "master"]
remote = origin
merge = refs/heads/master
[branch "LocalBranch"]
[branch "NewBranch"]
remote = origin
merge = refs/heads/master
First of all, there are 2 general types of branches you can have - Unpublished(local) and Published.
Published is accessible to all your team members and is also visible in Team Web Access (TWA).
So as you can see - my LocalBranch is not visible in list of branches from TWA.
To be able to work with Published branch you need a local copy of it - local branch. So you have - totally local branches - yours only, and local branches which are local working copy of Published branches.
All local branches are accessible to check-out in Branches list:
Creating a Branch
To create a branch in Visual Studio go to Branches menu:
Select New Branch and provide name of the new branch and which branch it should be taken from.
You can publish any unpublished branch by right-click -> "Publish Branch" or keep it local if you want to.
A bit more...
You can see yourself which branches are connected to which published version -
From Branches explorer in Visual Studio select Actions and "Open in File Explorer":
From there navigate to a hidden folder named .git and open for edit file config. This file has list of branches created and also information if the branch is published. That is how mine looks like:
[branch "PublishedBranch"]
remote = origin
merge = refs/heads/PublishedBranch
[branch "master"]
remote = origin
merge = refs/heads/master
[branch "LocalBranch"]
[branch "NewBranch"]
remote = origin
merge = refs/heads/master
Subscribe to:
Posts (Atom)